Lens to Lens- Part 3.
From concept to DVD, a flash of inspiration to flash of laser light.
This article first appeared in CQ-TV magazine, issue 215
We have looked at shooting a video production and editing the clips together to make a video production. Now we will take a look at the best way to prepare the production for distribution and the final stage of making a DVD, the authoring and burning process.
To recap on where we left off last time, the clips are added to the timeline in the desired order to match the storyboard and suitable transitions between the clips have been added. Titles and captions have been added as overlays and background sounds and music has been mixed with the sound track. Basically, the artistic part of production is finished and viewable in its final form in the preview window in the editing program. At the moment though, it only exists on the computer and can only be played back from within the editor. We need to convert it to a format that allows it to be viewed on the end-users own equipment whether that be over the Internet, on a mobile phone or the most likely scenario of a DVD.
Video can use up huge amounts of disk space, full broadcast quality recording take up about 21 megabytes per second, high definition recordings take even more. That equates to about 75 gigabytes per hour! Clearly this is too much to conveniently handle, even on DVD that would imply 18 disks for a one hour long program. What we have to do is compress the video down to a manageable size, both to make it easier to handle on the computer and especially to make distribution economical and user friendly. To be fair, those figures are higher than most people will encounter because a small amount of compression is generally present inside DV cameras, between the CCD and the tape recording electronics. DV runs at about 4 megabytes per second and that makes an hour long production 14 gigabytes long, still far too big to use. Video from analogue cameras cannot be directly recorded into the computer, it has to be digitised first. Some computers have suitable video inputs as standard but the majority will need support from some sort of A to D converter hardware or video capture card. With an ADC the conversion rate decides how big the file will be so it is possible to control the size of the file by setting the rate appropriately. The penalty for doing this is that the smaller the file, the less fluid the motion in the picture will be and the resolution (clarity) of the picture will also diminish. Even at very high data rates, it is difficult to match the quality that DV gives as standard. My own preference is to use a hardware device to convert analogue to DV standard and then to capture the DV into the computer with a Firewire link. This gives me the best possible conversion quality and gives the advantage of files that match the format of my DV camera recordings.
A word of caution regarding file sizes and Microsoft Windows; under Windows 95 the largest file you can store is 2Gb, far too small for video work. Later versions took the limit to 4Gb which is still highly restricting but just about usable if you split files into small chunks. To utilise files at full size you need to use either Windows NT, Windows 2000 or Windows XP and also set these to use the NTFS filing system. By default, Windows XP uses a filing system called FAT32 that still restricts to a maximum of 4Gb per file. Fortunately, the conversion to NTFS is fairly easy and doesnt lose any data but it does stop some, albeit a few, programs from running. The process cannot be reversed; NTFS cannot be changed back to FAT32 so be sure you understand the implications before doing it. The best solution is to dedicate one computer for video editing and keep all other work on another system. This will also prevent the slowing process that Windows suffers when more programs are installed. Video editing is slow enough as it is! As far as Im aware, other operating systems, including Linux do not impose restrictions on file sizes. Bear in mind that you will probably want several source recordings, your finished production and possibly temporary work files to reside on the computer at the same time, which could take an awful lot of storage space.
Video editing imposes a lot of strain on computer resources. Quite apart from the size of files there is the mathematics of working out the picture geometry and content and deciding what and where overlays and effects are to be added. There is no substitute for a fast microprocessor but there are a few tricks that help to speed things up. Firstly, dont run other programs on the computer at the same time. Despite the appearance of several applications running simultaneously, there is in fact only ever one at a time, modern computers run fast enough that you dont notice that much. All but one application is momentarily frozen. Not only are the other programs stealing time you could use for editing, the program that coordinates the task switching is also using slices of time as well. Prime suspects for slowing the computer down are anti-virus applications. Keeping a clean machine for editing only means you do not need to worry about virus attacks. A virus can only be installed on a computer if the virus code is executed, video and audio files are not executable, they are data files and as such are incapable of causing infection. If you are running other programs which require anti-virus protection the chances are that every single data transfer, and there could be millions in a video production, is being intercepted and checked unnecessarily which really slows thing down.
Computer hardware can also be a bottleneck in your production flow. Bearing in mind that your video files are likely to be huge, they are going to occupy quite a lot of physical disk space. Most operating systems are optimised to store as much as possible in a given disk space, they pack data into holes left behind when files have been deleted. Eventually, the files you are working with will be dotted all over the disk surface and in no particular order; this is called file fragmentation. As fragmentation increases, the rate at which data can be written to and read from the disk slows down. The electronics is still running at the same speed of course but because the disk head has to seek back and forth between the directory where the locations are held and the bits of file themselves, much of the transfer time is lost. Deleting unwanted files, perhaps from an old production, then running the operating systems defragmentation program will gather the file pieces together and rewrite them as a continuous block. The speed difference can be ten minutes or more in a one hour production - well worth doing. If your wallet can stretch to it, another way of greatly increasing speed is to use two or even three hard disks. With a single disk, even when free of fragmentation, the disk drive head still has to traverse between the source and destination files, reading from one and writing to the other. If the source material is stored on one drive and the destination on another, much of the seeking time is saved, particularly on the destination drive where the file can gracefully get bigger with little movement of the head. A third disk also helps because in almost all editing applications a number of temporary files are used. These typically are workspaces or video effect clips prior to being placed in the final output file. Keeping these out of the main data flow also keeps disk activity down and hence reduces lost time. When more than one disk is used, be aware of a limitation of PC motherboards. Most have two IDE channels that connect via ribbon cables to the hard disks and CD/DVD drives. The channels work independently of each other so to maximise the data flow, keep your source drives on one channel and destinations on the other. An IDE channel is momentarily blocked while in use by a device so it pays to let them overlap while fetching and storing the data. Simultaneous use of both IDE channels is possible despite what I previously said about only one task at a time running because disk data transfers are not controlled directly by the microprocessor. A device called a DMA (Direct Memory Access) controller takes care of shifting the data. SCSI drives and the new SATA are far more efficient at maintaining data flow so they are less of a problem.
Back to video work -
No matter how efficient the editing system is, eventually it will finish the task of creating a production, now all we have to do is find a suitable way of getting it to the end-user. In the editing suite, the video will most likely be of the best possible quality, it is easy to lose quality but impossible to put it back in so until we know its final format, dont make sacrifices. As we have seen, quality and size are closely related but some trade-off has to be made so that the size is more convenient to use. Our objective is to shrink the file so that it fits on the distribution medium, or can be streamed over a link with as little quality loss as possible. Two things decide the degree of compromise, the amount of compression and the bit rate, in other words how much the picture and sound can be reduced in size and how quickly that data can be transferred to and from the medium. It is quite easy to fit 20 or more hours of video on a DVD for example - if the data rate is low enough, but the quality would be lacking (Im being polite!). It is also possible to store HD video on a CD, and at full quality, but the recording would only last about 10 minutes. In short, the data rate, and only the data rate sets how much you can store but it imposes a ceiling on the quality achievable at that rate. Dropping the data rate to extend the play length also drops the highest quality you can expect to attain. The opposite isnt necessarily true. Using a data rate higher than necessary doesnt add quality that wasnt there before, it only wastes space.
The device or more likely, the software that converts the video and sound, possibly compressing it in the process, is called a CODEC. This is a contraction of two words, COder and DECoder which by implication tells us that a similar device or software is needed to recover the video before it can be used again. Some playback devices, DVD players and mobile video phones for example use a particular type of Decoder so to produce material for them you must use the appropriate CODEC at the production stage. Usually, a selection of commonly used CODECs are bundled with editing software because in almost every circumstance, the edited production will need to be prepared for playback to an audience with known equipment types. There is no reason why the same edited video cannot be compressed by several different CODECs to suite more than one client. A good example of this is BBC News which is compressed to MPEG-2 for satellite and Freeview viewers and also compressed to RealMedia format for viewing on their web site www.bbc.co.uk. The MPEG-2 broadcast runs at several megabits per second and gives very high quality and the web broadcast runs at 224 kilobits per second and watchable quality. It is possible to compress video with the intention of editing it at a later date, just making it smaller for now so it is easier to store. This can be done but there are limitations on some CODECs which need to be understood before using them for this purpose. The limitation, apart from some quality loss, is due to keyframes or rather the lack of them. These are points spread throughout the production where a full picture is stored and the sound tracks are synchronised to the video. They take up more storage space so one of the ways of cutting down the size is to follow a keyframe with several partial frames which only contain incremental changes from the previous frame. In other words, the keyframe marks a full picture and everything up to the next keyframe is only a partial picture. CODECs try to analyse the picture content and if they see a sudden large change they automatically insert a keyframe so the whole picture is updated again. If no dramatic changes are detected they can run for several hundred frames before another keyframe is put in for good measure. The problem with trying to re-edit compressed video is that if you try to make a cut in between keyframes you are likely to select one of the partial pictures. This isnt good and will give very unpredictable results. In reality, most editing packages will try to reconstruct a complete frame by searching backwards from the cut until a keyframe is found then building up the picture with subsequent frames until the cut is reached again. Doing this will inevitably be much slower than editing the source directly where every frame is complete, effectively all frames are keyframes.
The CODEC controls the data rate as well as the method of compression. Obviously, using the coding in a CODEC makes a file that needs a compatible decoding CODEC to convert it back to viewable video. On a computer this isnt a problem as the coding and decoding is usually performed by the same CODEC software. If the production is going to be played on another computer or on home entertainment equipment such as a DVD player, it is essential that a CODEC that can produce files to a common standard. By far the most commonly used CODEC is one that the produces MPEG-2 as this is what most of the World use for domentic viewing, at least when digital technologies are used, A relative new kid on the block is DIVX which uses MPEG-4 and produces smaller video files without sacrificing any more quality. A version of MPEG-4 is currently being used for HDTV broadcasts by satellite
Authoring a DVD.
The term authoring is perhaps a bit misleading as it implies something new is being created. In truth, the process is actually more akin to the work of a librarian, not creating but organising existing works. A DVD holds more than just video and audio files, it can also contain subtitle information and computer data files. Optionally, it can also hold selection menus and alternative video and sound tracks. Authoring is the process of merging all of these together into VOB files. VOB is an acronym for Video OBject although they also contain the audio tracks and everything else except files specifically intended for running only on computers. Dont confuse subtitle tracks with text overlaid into a video production. Overlaid video is actually part of the video image whereas a subtitle track contains plain text and time markers (cues) and is displayed by electronics in the playback device. Multiple subtitle tracks are often used, either to offer translation of words spoken in the main video production or to provide additional written information about the scene. Up to 32 tracks are normally available and which , if any, is displayed is decided by the viewer. The text is presented when the cue embedded in the text matches the main production time code.
A DVD can hold more than one production and each production can have up to 99 chapters. Each production is in a separate file and its chapter information is stored in an IFO file which you might think of as a list of bookmarks. As in a book, a chapter is nothing more than an entry point into the content to make it easier to find things quickly. A menu is rather like the contents page of a book except that as well as listing the files it has the capability of showing a background image or video and the selection itself can be made by picking an image or video. The menu is in fact a small video production in its own right and exists on the DVD as such but it contains links to the other files on the disk. Hidden in the DVD is a playlist which is the default selection and order of files to be played. It normally starts with the menu itself so that the user can select alternative files or chapters from the selection offered. The playlist also hold the information used to navigate from one file to another when one reaches its end. It could for example say return to the main menu or it could say play the next file in the list.
Putting a VOB file together is a complicated process and requires specialised software. Within each VOB there is at least one video stream and optionally many audio streams and subtitle streams. The different streams are multiplexed, meaning they are chopped into small chunks then laid end to end and joined into a single file. The order of the chunks, their size and distribution within the VOB is decided by analysing the content of the streams. Subtitles, which may need updating only once every few seconds are sparsely spread in the VOB but picture and sound, which obviously cant risk interruption, are more prevalent. All the chunks have headers that identify the type of content they hold and allow the playback equipment to route the data to the appropriate circuitry. Video and audio go to the CODECs and subtitles go to the character generator circuits and so on. As playback equipment is selective this way, often renaming a file ending in .VOB as .MPG will allow it to be played back as a computer file or even edited, the chunks irrelevant to the playback method being completely ignored. The software that multiplexes the VOB information normally also makes two other files, one ending with .IFO and one ending with .BUP. These hold the playlist information and lists of the location (sector numbers) where the files or entry points are physically located on the disk surface. When selections are made from the menu, the player reads the IFO file to discover where it should go to read the desired file. The BUP file isnt absolutely necessary, it is identical to the IFO file in every way, in fact BUP is an acronym for BackUP. It is only used if the player cannot read the IFO file and exists only to reduce the chance of the disk becoming unusable if slightly damaged. The video and audio files are to some degree error corrected and can withstand a small amount of data corruption but losing the navigation information would render the whole disk useless.
Producing a DVD.
Lets look at the process of converting the files into a physical entity, the plastic disk itself.
Commercially made disks are actually pressed from a template or glass master in a moulding machine. The process is very similar to the way vinyl LPs are (were!) made. The glass master is a mirror image of the recorded surface of the DVD and under the right conditions of temperature and pressure, it is pressed against a blank plastic ring to leave an impression of the data tracks on its surface. The plastic blanks are very thin, much thinner than the final disk will be because several have to be laminated together to make the final product. A DVD is actually made of a backing layer which becomes the printed or labelled side and is coated with a thin layer or aluminium on the inside surface, one or two pressed data layers and a protective bottom layer. Some disks have additional layers that are bonded or sprayed on to the layers mentioned.
The disk production company produces the glass master from files you send them. The usual format they xpect is an image of the final disk, exactly as it will be when pressed but on DLT media. This is a digital tape format, fairly common in large computer systems where it is used to back-up data from hard disks but not at all common in domestic computer use. The DLT image may also contain information to provide copy protection by inserting random video levels inside the blanking interval as an aid to deterring pirate copying. It is also possible to add CSS (Content Scrambling System) when producing the DLT tape. This is another anti-piracy protection system. Both these methods require a licence from their patent owners. The cost of adding protection is quite modest, even when only a few disks are prepared but it is by no means a bullet-proof way of stopping copies being made.
Some production houses will accept DVD-R or DVD+R master disks, the kind you can make on a computer at home but to use these for glass mastering they have to retrieve the files and rework them to change their formats. This is time consuming and costly. As an alternative to pressing disks, there are duplication houses that simply make copies of writable masters on to other writable disks. For small production runs this may be more economical as blank media is relatively inexpensive but the time to write each disk may be several minutes compared to a few seconds to press one from a blank. Writable media is also less compatible with domestic players because of its lower reflectivity and cannot have copy protection applied to it.
Most DVD production companies, whether using blanks or duplication machines will also print or label the disk top surface for you and they will normally also provide and print packaging materials as well. For this they normally work from standard JPG image files but it is worth checking to see if they expect complete images or colour separated images, it depends on their printing equipment.
If you are producing small quantities of disks or just a one-off of a home production it is certainly more economical to take a DIY approach. Blank DVD media costs (in June 2006) anything from 10p to 50p per disk. The prices drop considerably when ordered in bulk which usually means 25 or more. Many types of disk are printable so if you have a suitable printer you can add your artwork or title directly on to the special disk coating. Make sure you buy the right kind of printable disk, there are three different types which are completely imcompatible with each other! The first is inkjet printable, these have a surface coating which is similar to that on inkjet paper and they absorb ink into their surface. The second type is thermal, these use special transfers which are bonded to the surface by applying heat. They are not absorbent so using ink on them leaves a wet sticky mess - you were warned! The final type is a relatively new technology which is generally called LightScribe although that name is owned by a consortium of large companies. Other names from various companies exist for the same technology. The idea is that using a special disk coating will allow the disk to be turned upside-down in a DVD writer and written to by the same laser that writes the data to the bottom layer. Clever software converts your original artwork into a spiral line, which is then fed to the laser so it prints the disk as it rotates. To use this method a compatible drive type is also required, normal drives will not work, they simply dont recognise a disk is present when they cant see the reflective surface. Laser printed disks are monochrome only, there is no colour version of LightScribe at present and the disks themselves are considerably more expensive than normal ones.
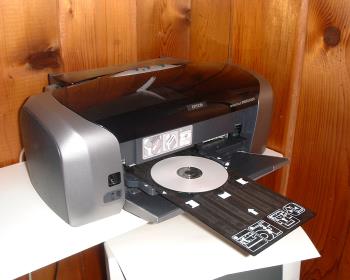
A printable DVD loaded in a special carrier prior to inkjet printing it's top surface
An alternative method of applying artwork is to print on paper labels and stick them on the disk surface. Special donut shaped self-adhesive labels are readily available just for this purpose. However, I strongly suggest you avoid this method. In the early days of CD and DVD media the disks were expected to rotate quite slowly and the effect of poor balance wasnt too much of a problem. Modern disks spin as fast as 52 times normal playback speed and even the slightest eccentricity or imbalance can cause serious damage to the disk and the machine it is in. I have even witnessed a disk shattering in a drive. Even a lightweight plastic disk can be frightening when it breaks up at several thousand RPM! It isnt unknown for the label to detach itself and glue the drive mechanics together either.
Lasers
I gave this series an alternate title - A flash of inspiration to a flash of laser light. I hope I have covered the inspiration side of things, Im now going to give a brief insight into the operation of the laser and why it is necessary to use one in a DVD or CD player.
Laser is an acronym for Light Amplification by Stimulated Emission of Radiation, the version with a Z in it is a by-product of science-fiction weaponry and nothing to do with electronics.
Original lasers used ionised gasses and specially shaped mirrors to make self-sustaining and highly focussed light beams. That technology is still used when high power is involved but for our needs we have a wonderful device called a laser diode. It is not an LED in the conventional sense as it relies upon a different shape of emitter structure and different semiconductor materials. Laser diodes are also notoriously difficult to stabilise, too little current gives a dull glow and too much burns them out. The middle region where they lase is very small and feedback circuits are needed to compensate for changes due to heating and supply irregularity. Usually they incorporate a light sensing photo-diode in the same package to monitor and provide a control voltage to keep the feed current to the laser diode within acceptable limits.
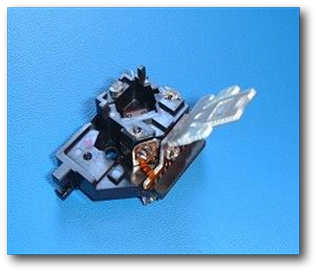
A laser pickup assembly from a scrapped DVD player. Note the square mirror in the centre and the sensor that would normally be directly above it. The assembly is shown upside down, the disk's reflective side would be below the pick-up in this picture.
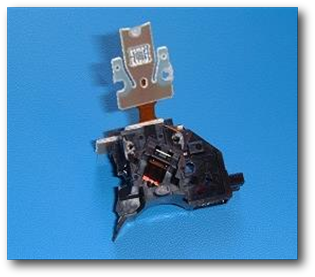
The same laser pickup assembly from the opposite side. The three solder joints facing you are the connections to the laser diode and it's internal feedback sensor.
What makes lasers so special is they produce light of a single wavelength, in other words of a pure colour. Most light sources produce a spread of colours, even though to the human eye they are indistinguishable from the overall hue. A green LED for example, produces light centred on the green part of the spectrum but also has a portion more red and more blue than the dominant green. If we could look at the waves we would see they were a mix of different wavelengths, all adding and cancelling each other to give an almost random envelope of radiation level. Laser light on the other hand is very pure and by combining light from a single laser source after splitting it and sending it via different paths will give a consistent result. The level will depend upon the phase shift between the light from the two paths, if they arrive in phase they will add, if out of phase they subtract. The important thing to note is that if the path distances remain the same, so will the resulting light level.
Lasers used in DVD and CD playback utilise the phase cancelling effect to read data from the disk. The laser assembly, the diode, sensor and focussing mechanism are moved across the disk by a motor. Another motor spins the disk so that from the pick-up assemblys point of view, the disk surface is whizzing past the laser at high speed. Inside the pick-up is the laser diode, a partially reflecting mirror and a light sensor. The laser light hits the mirror and some of the light is reflected directly at the sensor. The light that passed through the mirror is focussed by a lens onto the disk surface. Light reflecting back from the disk is also directed to the same sensor as the direct laser light. Earlier I mentioned that DVDs are pressed from a master, the master imprints pits into the disk surface. At the colour of the laser the pits are exactly one quarter wavelength deep. Light arriving at the sensor that reflected from the gap between pits has therefore travelled less distance than light reflecting from the bottom of a pit by the time taken for light to travel one half wavelength (down the pit and back again). When the beams reach the sensor they are therefore in phase (adding) or shifted by have a wavelength (subtracting). The effect is the sensor sees flashes of reflected light in sympathy with the pit arrangement on the disk surface. The flashes are easily converted back to voltage levels so the drive electronics can process them. All the pits are the same depth, the digital ones and zeroes are represented by the length of the pit, short or long - Morse code again!
The future of video disks
The amount of data that can be stored on a conventional DVD is about 4.7Gb per data layer and this is fixed by the density of pits that can be impressed on the disks surface. In order to dig the pit to the right depth a certain amount of width is also necessary. This is simply a fact of physics, you cant dig a depth without an associated width and the deeper you go, the wider the width becomes. To cope with the ever-increasing demand for more data storage the only practical way forward is to make more pits and given that the disk area is fixed, each must be smaller than before. It is possible to make glass masters with smaller bumps (remember they are the opposite of pits) so that isnt a problem. The laser is the stumbling block, with shallower pits the amount of phase change can no longer cause complete cancellation of the reflected light. The solution is to shorten the wavelength of the laser light so cancellation occurs with a smaller time shift in the reflection. This is where blue lasers come into play, conventional ones are red by the way. Because of the way laser diodes are made, it is very difficult to fabricate them to give shorter wavelengths while still producing adequate power. Thats why the new generation of Blue Ray DVD players are so expensive. Its worth remembering that the difference in frequency between red and blue is many hundreds of times greater than the difference between Top band and 10GHz Amateur bands! No doubt the price of blue lasers will drop in proportion to demand just as happened with the red laser. Time will tell...